There are many ways to setup coupons in the Business Plus Accounting POS software package. Using the Define Menu Items option in Manager Functions, coupons can be added to one of the tabs in your sales screen. The following are examples of how to setup coupons:
An "Open Coupon" button
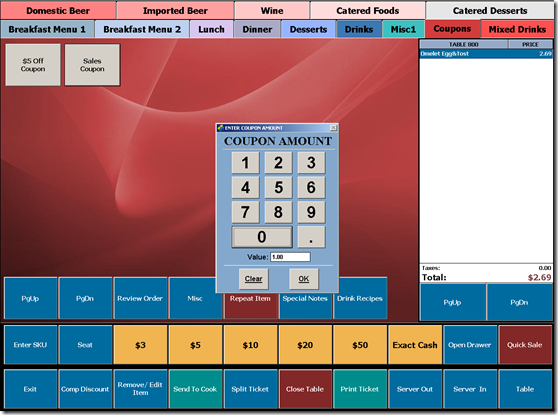
By default, we have two pre-built products that you can add to your menu. The first product is called "COUPON". This product allows you to discount an order for the amount that you specify during the sale. For example, if you are giving the customer a $1.00 discount off of their order, you would choose this item on your sales screen, and enter "1.00" on the coupon prompt.
The second pre-built coupon product is called "COUPON NO TAX." The "COUPON NO TAX" product will also allow you to specify the amount you want to discount an order. However, this product will not affect the sales tax due.
For example, let's say you have an order for $10, with a 5% tax rate. The tax on that order will be 50 cents. If you use the COUPON NO TAX item to discount the order by $1.00, the taxes due on that sale will still be 50 cents...making the total of the sale $9.50.
To add one of the pre-built "Open Coupon" buttons to your sales screen, perform the following steps:
For Restaurant POS/Delivery POS customers
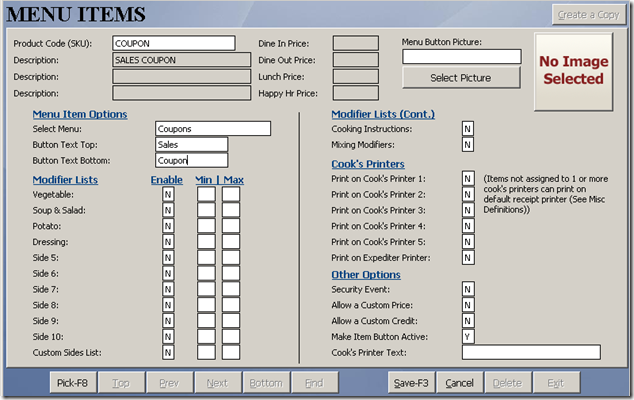
a. Go to Restaurant System-->Manager Functions-->Define Menu Items-->Add.
b. In the Product Code(Sku) field, press the F8 key on your keyboard.
c. Select either the "COUPON" product or the "COUPON NO TAX" product.
Note: Remember, the "COUPON" product will adjust the sales tax amount when the discount is applied. The "COUPON NO TAX" product will not affect the sales tax amount.
d. In the Select Menu field, press the F8 key on your keyboard. Select the menu on your sales that you would like to place the coupon button under.
e. In the Button Text Top and Button Text Bottom fields, enter the text that will show on the button in your sales screen. For example, you could enter "Sales Coupon" in these fields.
f. Press Save when finished.
For Retail POS customers
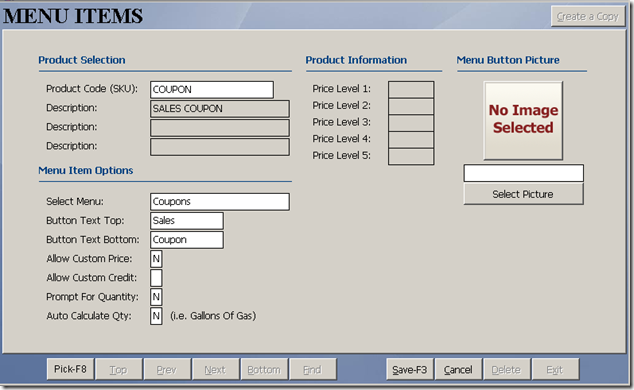
a. Go to Touch Screen POS-->POS Manager Functions-->Define Menu Items-->Add.
b. In the Product Code(Sku) field, press the F8 key on your keyboard.
c. Select either the "COUPON" product or the "COUPON NO TAX" product.
Note: Remember, the "COUPON" product will adjust the sales tax amount when the discount is applied. The "COUPON NO TAX" product will not affect the sales tax amount.
d. In the Select Menu field, press the F8 key on your keyboard. Select the menu on your sales that you would like to place the coupon button under.
e. In the Button Text Top and Button Text Bottom fields, enter the text that will show on the button in your sales screen. For example, you could enter "Sales Coupon" in these fields.
f. Press Save when finished.
Adding a Coupon Button That Deducts A Specific Dollar Amount
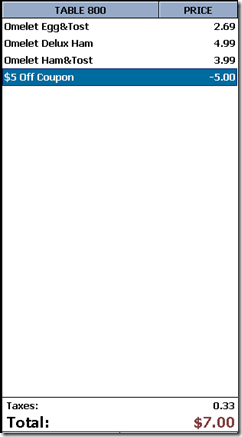
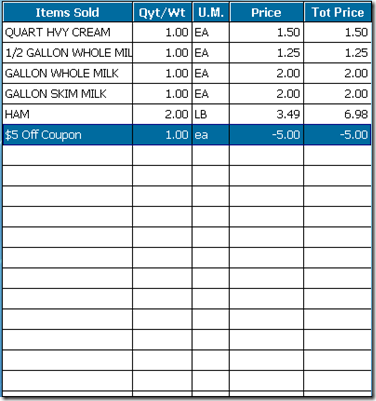
Instead of adding an "Open Coupon" button to your sales screen, you can also add a button that deducts a specific dollar amount off of the order. For example, you can add a button that removes $5.00 off of an order. To do this, you will need to create a product in the system that has a negative(-) price. Using our $5.00 off coupon example, you would create a product with a price of $-5.00.
To add a coupon that deducts a specific dollar amount, perform the following steps:
For Restaurant POS/Delivery POS customers
1. Add the Coupon to Your Product Database
a. Go to Restaurant System-->Manager Functions-->Define Products-->Add
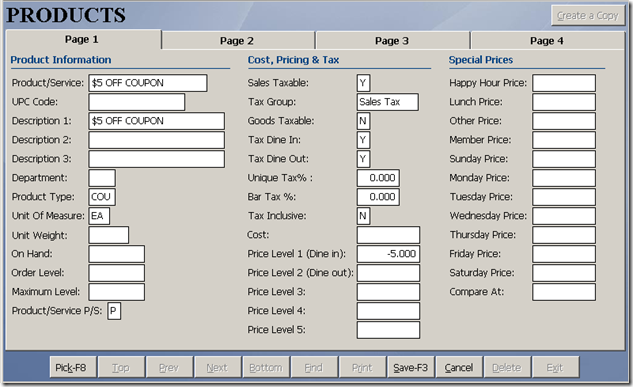
b. Product/Service - In this field, give your coupon product a name. For example, using our $5.00 off coupon example, you can name it "5.00 Off Coupon."
c. Description 1 – Again, this is the name of the coupon. This field appears on the customer receipt, so try not to use any abbreviations in this field.
d. Product Type – This field allows you to categorize the coupon for reporting purposes. Your system will have a pre-built Product Type called "COUPON." Press the F8 key to view a list of categories, then select the "COUPON" Product Type.
e. Sales Taxable - In the above "Open Coupon" option, we mentioned that you can use the "COUPON NO TAX" product to deduct a dollar amount from an order, without affecting the total sales tax. This field allows you to do the same. Placing a "Y" in this field will allow the system to adjust the total sales tax of the order when the coupon is used. With a "N" in this field, the total sales tax of the order will not be adjusted.
f. Price Level 1 - This is amount of the coupon. Using our $5.00 off example, you would enter "-5.00" in this field.
g. Press Save when finished.
2. Add the Coupon to Your Sales Menu
a. Go to Restaurant System-->Manager Functions-->Define Menu Items-->Add.
b. In the Product Code(Sku) field, press the F8 key on your keyboard.
c. Select either the name of the coupon that you created in Define Products.
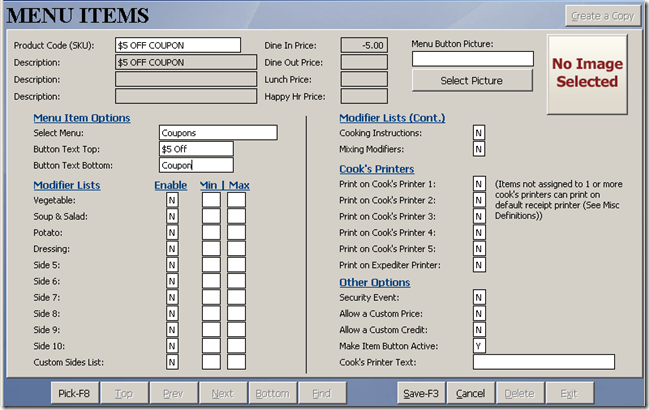
d. In the Select Menu field, press the F8 key on your keyboard. Select the menu on your sales that you would like to place the coupon button under.
e. In the Button Text Top and Button Text Bottom fields, enter the text that will show on the button in your sales screen. For example, you could enter $5 Off Coupon" in these fields.
f. Press Save when finished.
For Retail POS customers
1. Add the Coupon to Your Product Database
a. Go to Touch Screen POS-->POS Manager Functions-->Define Products-->Add
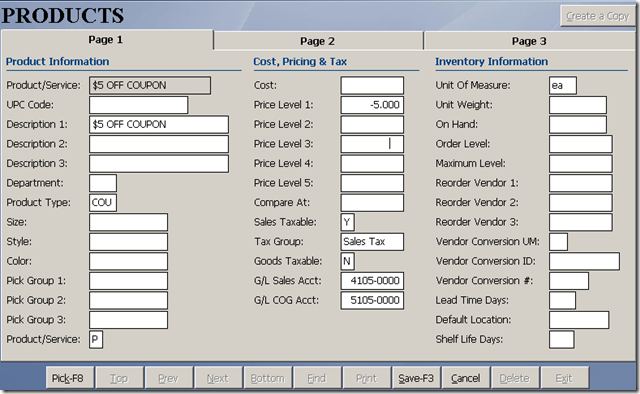
b. Product/Service - In this field, give your coupon product a name. For example, using our $5.00 off coupon example, you can name it "5.00 Off Coupon."
c. Description 1 – Again, this is the name of the coupon. This field appears on the customer receipt, so try not to use any abbreviations in this field.
d. Product Type – This field allows you to categorize the coupon for reporting purposes. Your system will have a pre-built Product Type called "COUPON." Press the F8 key to view a list of categories, then select the "COUPON" Product Type.
e. Sales Taxable - In the above "Open Coupon" option, we mentioned that you can use the "COUPON NO TAX" product to deduct a dollar amount from an order, without affecting the total sales tax. This field allows you to do the same. Placing a "Y" in this field will allow the system to adjust the total sales tax of the order when the coupon is used. With a "N" in this field, the total sales tax of the order will not be adjusted.
f. Price Level 1 - This is amount of the coupon. Using our $5.00 off example, you would enter "-5.00" in this field.
g. Press Save when finished.
2. Add the Coupon to Your Sales Menu
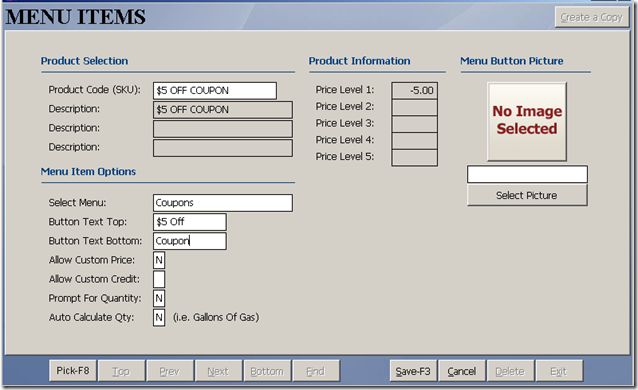
a. Go to Touch Screen POS-->POS Manager Functions-->Define Menu Items-->Add
b. In the Product Code(Sku) field, press the F8 key on your keyboard.
c. Select either the name of the coupon that you created in Define Products.
d. In the Select Menu field, press the F8 key on your keyboard. Select the menu on your sales that you would like to place the coupon button under.
e. In the Button Text Top and Button Text Bottom fields, enter the text that will show on the button in your sales screen. For example, you could enter $5 Off Coupon" in these fields.
f. Press Save when finished.